Bevy Traditional Roguelike Quick-Start - 2. Tiles to Frolic Around In

Motionless floating in the void is getting old. Let's remedy this.

Our player might have a Transform translation of 0, making it appear in the centre of the screen, but that is merely a visual position. Roguelikes take place on a grid, and if a spell starts summoning magical rainbow clouds, it will need to know where to place those pretty vapours. This is where a new component, Position, comes in.

/// A position on the map.
#[derive(Component, PartialEq, Eq, Hash, Copy, Clone, Debug)]
pub struct Position {
    pub x: i32,
    pub y: i32,
}

impl Position {
    /// Create a new Position instance.
    pub fn new(x: i32, y: i32) -> Self {
        Self { x, y }
    }

    /// Edit an existing Position with new coordinates.
    pub fn update(&mut self, x: i32, y: i32) {
        (self.x, self.y) = (x, y);
    }
}

This is, quite literally, a glorified (i32, i32) tuple with some functions to help manage its fields. The vast list of #[derive] macros is mostly self-explanatory, aside from the Hash which will be relevant later.

Not only do Creatures have a visual apperance, they also have a place where they exist on that grid. That is why they now obtain this new Position Component:

#[derive(Bundle)]
pub struct Creature {
    pub position: Position, // NEW!
    pub sprite: Sprite,
}

// SNIP

fn spawn_player(
    mut commands: Commands,
    asset_server: Res<AssetServer>,
    atlas_layout: Res<SpriteSheetAtlas>,
) {
    commands.spawn(Creature {
        Creature {
            position: Position { x: 4, y: 4 }, // NEW!
            sprite: Sprite {
                image: asset_server.load("spritesheet.png"),
                custom_size: Some(Vec2::new(64., 64.)),
                texture_atlas: Some(TextureAtlas {
                    layout: atlas_layout.handle.clone(),
                    index: 0,
                }),
                ..default()
            },
        },
    );
}

The choice of (4, 4) as the player's starting coordinates is arbitrary, but will be useful imminently to show off the visual effect of this offset from (0, 0).

Right now, Position does absolutely nothing. Even if it did do something, it would be quite difficult to tell, as there is only a single creature in this entire gray plane of nothingness and no other reference points. Let us fix that by placing the player into a 9x9 white cage of walls:

fn spawn_cage(
    mut commands: Commands,
    asset_server: Res<AssetServer>,
    atlas_layout: Res<SpriteSheetAtlas>,
) {
    let cage = "#########\
                #.......#\
                #.......#\
                #.......#\
                #.......#\
                #.......#\
                #.......#\
                #.......#\
                #########";
    for (idx, tile_char) in cage.char_indices() {
        let position = Position::new(idx as i32 % 9, idx as i32 / 9);
        let index = match tile_char {
            '#' => 3,
            _ => continue,
        };
        commands.spawn(Creature {
            position,
            sprite: Sprite {
                image: asset_server.load("spritesheet.png"),
                custom_size: Some(Vec2::new(64., 64.)),
                texture_atlas: Some(TextureAtlas {
                    layout: atlas_layout.handle.clone(),
                    index,
                }),
                ..default()
            },
        });
    }
}

For each character within the cage string, the (x, y) Position is derived using modulo and division, respectively (every 9 tiles, the y coordinate increments by 1, and the remainder of that division is the x coordinate). Note that this will cause a mirror flip (as this code starts counting from the top, whereas Bevy's coordinate system starts counting from the bottom). This will not be an issue when the map generator is refactored in a future chapter.

As for the # being proper walls, we simply abort the loop for any character that is not a #, and assign sprite index "3" for those that are. This will go fetch the third sprite in our spritesheet!

Finally, the walls can be spawned one by one. Note the Transform::from_scale(Vec3::new(4., 4., 0.))̀, which is the exact same as the player - currently, every creature is drawn in the centre of the screen with a size of 64x64 (4 times 16 x 4 times 16).

Yes, the walls are Creatures. You can imagine them as really big, lazy snails if that floats your boat.

Don't forget to add this new system:

fn main() {
    App::new()
        .add_plugins(DefaultPlugins.set(ImagePlugin::default_nearest()))
        .init_resource::<SpriteSheetAtlas>()
        .add_systems(Startup, setup_camera)
        .add_systems(Startup, spawn_player)
        .add_systems(Startup, spawn_cage) // NEW!
        .run();
}

Running cargo run will prove unimpressive.

A Bevy app with a single wall tile in the centre.

The player is still there, drawn under a pile of 32 walls. Position is still completely ineffectual. Disappointing! It is time to remedy this. First, we'll need a way to quickly tell Bevy which of these 33 creatures is the Player:

/// Marker for the player
#[derive(Component)]
pub struct Player;

And, of course, to assign this new component to said player:

fn spawn_player(
    mut commands: Commands,
    asset_server: Res<AssetServer>,
    atlas_layout: Res<SpriteSheetAtlas>,
) {
    commands.spawn(( // CHANGED - Note the added parentheses.
        Creature {
            position: Position { x: 4, y: 4 },
            sprite: Sprite {
                image: asset_server.load("spritesheet.png"),
                custom_size: Some(Vec2::new(64., 64.)),
                texture_atlas: Some(TextureAtlas {
                    layout: atlas_layout.handle.clone(),
                    index: 0,
                }),
                ..default()
            },
        },
        Player, // NEW!
    )); // CHANGED - Note the added parentheses.
}

Indeed, commands.spawn() doesn't only accept a single Bundle (Creature), but rather any set of Components and Bundles, arranged in a tuple. This (Creature, Player) tuple is therefore a valid argument!

Just like Position, Player also currently does nothing. However, it's time to unify everything with our very first Update system:

/// Each frame, adjust every entity's display location to match
/// their position on the grid, and make the camera follow the player.
fn adjust_transforms(
    mut creatures: Query<(&Position, &mut Transform, Has<Player>)>,
    mut camera: Query<&mut Transform, (With<Camera>, Without<Position>)>,
) {
    for (pos, mut trans, is_player) in creatures.iter_mut() {
        // Multiplied by the graphical size of a tile, which is 64x64.
        trans.translation.x = pos.x as f32 * 64.;
        trans.translation.y = pos.y as f32 * 64.;
        if is_player {
            // The camera follows the player.
            let mut camera_trans = camera.get_single_mut().unwrap();
            (camera_trans.translation.x, camera_trans.translation.y) =
                (trans.translation.x, trans.translation.y);
        }
    }
}

This introduces a major Bevy feature: Query. A query will go fetch all Entities in the game that match their Component list and added filters.

Queries are always structured Query<QueryData, QueryFilter> where both of these are either a single parameter or multiple ones bundled in a tuple. Each one is also optional - you can have zero filters or only filters, should you desire that.

  • Query<(&Position, &mut Transform, Has<Player>)> is trying to fetch every creature in the grid, checking if it's the player or not, see where it is located and edit its visual position.

It grants us access to all Entities with both Position and Transform. The Position component is exposed for read-only access, while Transform is allowed to be modified. There is also an optional Has<Player>, which is a boolean determining if the current Entity being accessed has the Player component or not.

Note that this first query only has a tuple of these 3 elements. If we wanted, we could have added additional QueryFilter after a comma, which is the case of the second ̀Query:

  • Query<&mut Transform, (With<Camera>, Without<Position>)> is trying to fetch the camera viewing the scene, and to move it around.

It grants us access to all Entities with Transform exposed for modification, with the added condition that Camera must be possessed by the Entity. There is, however, something peculiar here: Without<Position>.

Bevy doesn't know that a Camera and a Creature are two different things - it only sees the components. As far as it's concerned, nothing stops us from spawning in a creature that also has a Camera installed. In this case, this poor mutated chimera Creature would be caught by both queries at the same time, and have its Transform component mutably accessed twice in a row.

Those familiar with Rust's holy commandments will know that this is unacceptable. Try it without the Without<Position> filter, and the game will panic on startup.

The first loop fetches the player, as well as every wall. We loop through all of the matched entities with iter_mut(), then multiply their Position x and y coordinates by 64.0. This is the size of one tile (64 pixels x 64 pixels), letting this value become a graphical offset once it is assigned to their Transform component's translation field, moving them across the screen!

Then, if that Entity was the player, the camera should be displaced to follow it. As the ̀Query<&mut Transform, (With<Camera>, Without<Position>)> only fetches a single Entity, we can use the risky get_single_mut which will panic should there ever be more than one Entity fetched by the ̀Querỳ. Match the Camera's translation with the Player's translation, and the system is complete!

Don't forget to register this new system.

fn main() {
    App::new()
        .add_plugins(DefaultPlugins.set(ImagePlugin::default_nearest()))
        .init_resource::<SpriteSheetAtlas>()
        .add_systems(Startup, setup_camera)
        .add_systems(Startup, spawn_player)
        .add_systems(Startup, spawn_cage)
        .add_systems(Update, adjust_transforms) // NEW!
        .run();
}

Compile once more with cargo run. It will reveal the player in its little cage, with no more visual superposition of entities!

A Bevy app with the player in the centre, surrounded by 9x9 walls.

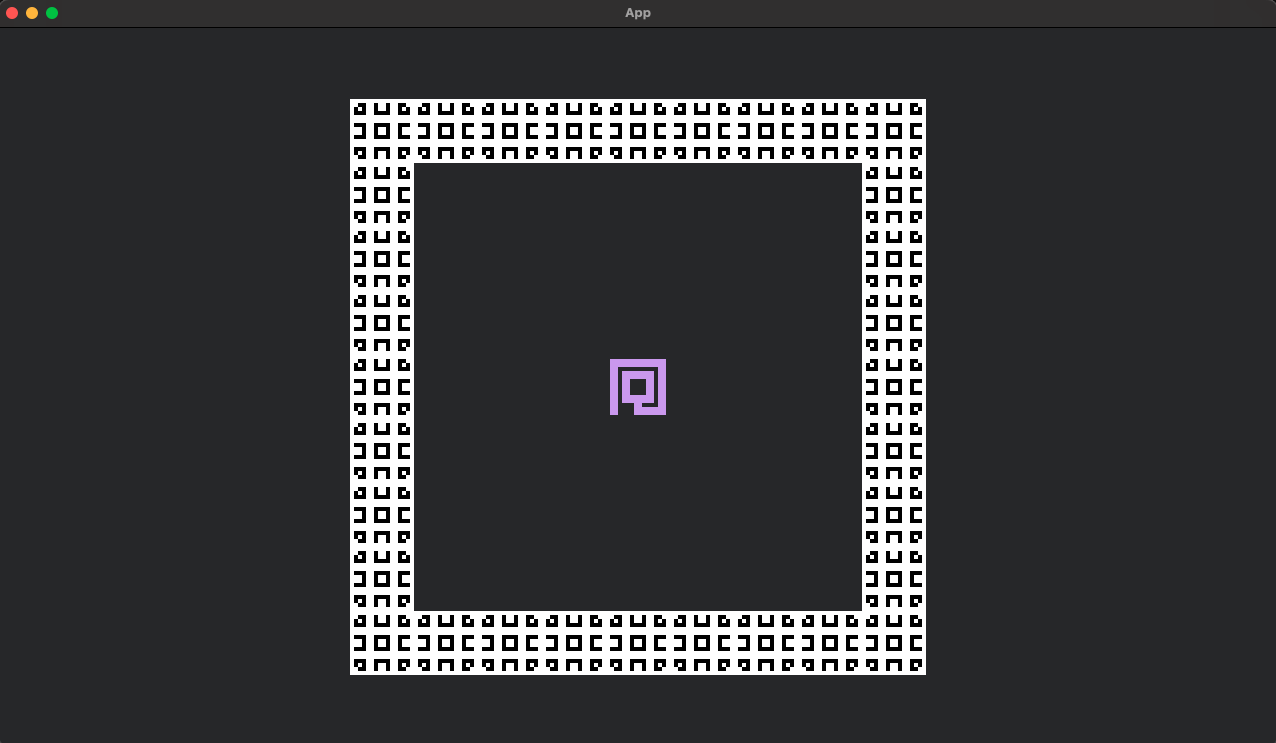
Since this new system is Update, it runs every frame and readjusts all Creatures where they need to be relative to the player. This isn't very useful as everyone here is cursed with eternal paralysis... Let's fix that.

/// Each frame, if a button is pressed, move the player 1 tile.
fn keyboard_input(
    input: Res<ButtonInput<KeyCode>>,
    mut player: Query<&mut Position, With<Player>>,
) {
    let mut player = player.get_single_mut().expect("0 or 2+ players");
    // WASD keys are used here. If your keyboard uses a different layout
    // (such as AZERTY), change the KeyCodes.
    if input.pressed(KeyCode::KeyW) {
        player.y += 1;
    }
    if input.pressed(KeyCode::KeyD) {
        player.x += 1;
    }
    if input.pressed(KeyCode::KeyA) {
        player.x -= 1;
    }
    if input.pressed(KeyCode::KeyS) {
        player.y -= 1;
    }
}

Res<ButtonInput<KeyCode>> is a Bevy resource to manage all flavours of button mashing, from gentle taps to bulldozing over the keyboard. It contains some subtly different functions - for example, pressed triggers every frame throughout a maintained press, whereas just_pressed only triggers once on the initial press.

The player is once again fetched - mutably, this time around - and its coordinates are changed, which will result in the walls visually moving to represent this new arrangement!

Register the new system.

fn main() {
    App::new()
        .add_plugins(DefaultPlugins.set(ImagePlugin::default_nearest()))
        .init_resource::<SpriteSheetAtlas>()
        .add_systems(Startup, setup_camera)
        .add_systems(Startup, spawn_player)
        .add_systems(Startup, spawn_cage)
        .add_systems(Update, adjust_transforms)
        .add_systems(Update, keyboard_input) // NEW!
        .run();
}

cargo run. You can now move around the cage... and escape it with zero difficulty by phasing through the walls, running at the speed of light into the far reaches of reality itself. Note that despite the ludicrous speed, it is impossible to stop "clipping" to the grid - you will never be in between two walls!

A Bevy app with the player moving frantically, ignoring all walls.

Enforcing basic physical principles will be the topic of the next tutorial!

Bevy Traditional Roguelike Quick-Start - 1. Drawing the Player Character

Traditional roguelikes are an ancient genre of games which earned the peak of their fame in the 20th century. They are the ancestors of modern indie roguelikes beloved by many such as Hades, The Binding of Isaac or Risk of Rain. What a "true roguelike" is has been the driving force of multiple Internet flamewars, but it almost always revolves around this list:

  • The game takes place on a grid, like Chess.
  • The game is turn-based: the player moves, then monsters do.
  • The environment is randomized with procedural generation.
  • When the player dies, the game restarts from scratch.

Traditional roguelikes, despite their age, still live today. Major releases with a still active community today include:

  • Caves of Qud
  • Dungeon Crawl Stone Soup
  • Cataclysm Dark Days Ahead
  • Nethack

There are multiple reasons why I think this genre is well suited for a beginner-level Bevy Quickstart guide:

  • Traditionally terrible minimalistic graphics. No great artistic expectations will be forced on you!
  • Infinitely extensible design that lends itself very easily to imagining new abilities, foes and challenges!
  • An Event-centric, turn-based architecture to show off the power of Bevy's ECS.
  • Fun! For nerds.

This tutorial assumes:

  • That you have never touched Bevy before.
  • That you have some beginner Rust experience and know what "borrow checking" is. If you do not, I recommend going through the first half of the rustlings suite of interactive exercises to get you up to speed.
    • No concurrency or dynamic dispatch Rust technowizardry will be required. Only the basics.

The nature of ECS has been covered earlier in the Quick Start guide. Here is a metaphorical reminder:

  • Entities - The actors on the stage.
  • Components - The costumes and characters worn by the actors.
  • Systems - The script of the play.

Setting the Stage - The App

Writing cargo new bevy-quick-start creates a Rust version of the evergreen Hello World program. It feels quite distant from anything resembling a game you can play in a contained window, except perhaps a prehistoric text adventure. Let's fix that by replacing the code in fn main:

/// The entry point into the game, where everything begins.
fn main() {
    App::new()
        .add_plugins(DefaultPlugins)
        .run();
}

It would also be wise to import Bevy in a Bevy project. Place this on the very first line of main.rs:

use bevy::prelude::*;

The App is the primary container of the game - the theatre in which the actors will play. To ensure it starts off with all the basic Bevy features, the DefaultPlugins plugin must be tacked onto it.

Running this code with cargo run will result in an empty, boring window. Progress!

The First Denizen - The Player

The player needs an avatar through which they will interact with the game world. In a traditional roguelike, this player will be a Creature - just like the foes and friends they will meet - susceptible to motion, health and other restrictions that come from having a physical body.

In fact, our game will likely be populated by a lot of these Creatures. Let us define what that is:

/// Common components relating to spawning a new Creature.
#[derive(Bundle)]
struct Creature {
    sprite: Sprite,
}

Right now, a Creature doesn't have much more beyond a sprite, which is its graphical representation on screen.

And let us spawn the player:

/// Spawn the player character.
fn spawn_player(
    // Bevy's Commands add, modify or remove Entities.
    mut commands: Commands,
    // A builtin Bevy resource that manages textures and other assets.
    asset_server: Res<AssetServer>,
) {
    // The spawn command summons a new Entity with the components specified within.
    commands.spawn(Creature {
        sprite: Sprite {
            // What does the player look like?
            image: asset_server.load("otter.png"),
            // Everything else should be default (for example, the player should be Visible)
            ..default()
        },
    });
}

At any moment while using Bevy, should one need to:

  • Spawn a new Entity
  • Delete an Entity
  • Attach a new Component to an Entity
  • Remove a Component from an Entity

A mutable Commands argument will likely be required. This is the case here, as a new Entity is being spawned.

Since we are also pulling a visual asset from a file into the game, the AssetServer is similarly required. It is a Resource, shown by the wrapping Res<_>, which is a Bevy type to be discovered later in this tutorial.

We will also need to run this new function - or, in Bevy terms, System - by attaching it to the ̀App:

fn main() {
    App::new()
        .add_plugins(DefaultPlugins)
        .add_systems(Startup, spawn_player) // NEW!
        .run();
}

Startup systems run once when booting up the app, then are never ran again.

The player is thus spawned with the texture "otter.png" at the position (0.0, 0.0, 0.0). Note the Z-coordinate - in a 2D game, it is still useful, as it determines which Entities get to be drawn on top of each other. More on that later.

Using cargo run on this will result in an error:

ERROR bevy_asset::server: Path not found: your/path/here/bevy-quick-start/assets/otter.png

Of course, we need to provide the image. In your game's root directory (where src and Cargo.toml currently exist), create a new directory named assets. If the App is the theatre, this is the costume storage - containing all the image data that Entities can take up as their visual sprite representations.

Then, place any image of your choosing within it, renaming it so its filename matches the one used in the ̀texture field in your code.

Are you ready? cargo run! This will result in the exciting sight of... absolutely nothing.

Bird's Eye View - The Camera

In Bevy, spawning entities left and right isn't very interesting if we are incapable of viewing them. We need to give ourselves eyes to see - a Camera:

/// The camera, allowing Entities to be seen through the App window.
fn setup_camera(mut commands: Commands) {
    commands.spawn((
        Camera2d::default(),
        Transform::from_xyz(0., 0., 0.),
    ));
}

Quite similar to spawning the player - after all, a Camera is just another Entity, just like anything in a Bevy game. The only difference is in its Components, which include Camera. Somewhere, deep in Bevy source code, there is a System fetching any Entity that contains Camera and doing some magic to make it display the screen's contents.

We also need to welcome this new actor onto the stage by tying it to the App:

fn main() {
    App::new()
        .add_plugins(DefaultPlugins)
        .add_systems(Startup, spawn_player)
        .add_systems(Startup, setup_camera) // NEW!
        .run();
}

Running ̀cargo run will now - assuming you had as much good taste as I did to pick a cute otter as my example image - display the player "character"!

A Bevy app with a picture of an otter in the centre.

Bundling Them Up - The Spritesheet

Unfortunately, we cannot build our epic roguelike dungeon out of otters. There will be different Creatures - foes, friends, or even walls - the latter behaving like other beings, letting them have health and be shoved around. They will be represented by different glyph-like sprites, and throwing around 100+ .png files in the ̀assets directory is not my definition of careful organization.

This is where the Spritesheet comes in - one image containing all game sprites next to each other, with a special Atlas to dictate which part of this image will be cropped out to represent each Creature.

#[derive(Resource)]
struct SpriteSheetAtlas {
    handle: Handle<TextureAtlasLayout>,
}

This marks the creation of our first Resource. A Resource, in Bevy, is basically a global mutable variable. You can imagine it in the same way that you need to spend "wood resources" to build houses in a construction game - the wood is likely represented by a little icon on the side of the screen with a number next to it. It doesn't belong to a certain Entity - it belongs to the game as a whole.

In this case, this Resource is an Atlas, mapping the spritesheet to divide it in tidy 16x16 squares. It will be accessible each time a new Creature is made, to assign it a specific region of that spritesheet.

This Resource must be initialized:

/// An initialization of the sprite sheet atlas, ran from `init_resource`.
impl FromWorld for SpriteSheetAtlas {
    fn from_world(world: &mut World) -> Self {
        // The spritesheet is composed of 16x16 squares.
        // There are 8 sprite columns, spread across 1 row.
        // There is no padding between the cells (None) and no offset (None)
        let layout = TextureAtlasLayout::from_grid(UVec2::splat(16), 160, 2, None, None);
        // Grab the active atlases stored by Bevy.
        let mut texture_atlases = world
            .get_resource_mut::<Assets<TextureAtlasLayout>>()
            .unwrap();
        // Add the new Atlas in Bevy's atlases and store it in the Resource.
        Self {
            handle: texture_atlases.add(layout),
        }
    }
}

Any Resource which implements FromWorld will, upon running init_resource, run the code contained in the impl block to create a new instance of it.

The TextureAtlasLayout specifies the crop layout. Each sprite is 16x16 (UVec2::splat(16) is a shortform of UVec2::new(16, 16)), there are 160 sprite columns and 2 rows, and there is no padding nor offset (None, None).

This is stored into Bevy's atlases list, and is saved into the Resource for future usage.

At last, this spritesheet must be properly welcomed through the App:

fn main() {
    App::new()
        .add_plugins(DefaultPlugins)
        .init_resource::<SpriteSheetAtlas>() // NEW!
        .add_systems(Startup, setup_camera)
        .add_systems(Startup, spawn_player)
        .run();
}

Now that we have our Atlas, we need to add it to new Creatures. Not only do they have a sprite (the spritesheet), they also have a select crop of that spritesheet (the Atlas) to represent them:

fn spawn_player(
    mut commands: Commands,
    asset_server: Res<AssetServer>,
    atlas_layout: Res<SpriteSheetAtlas>, // NEW!
) {
    commands.spawn(
        Creature {
            sprite: Sprite {
                // CHANGED to spritesheet.png.
                image: asset_server.load("spritesheet.png"),
                // NEW! 
                // Custom size, for 64x64 pixel tiles.
                custom_size: Some(Vec2::new(64., 64.)),
                // Our atlas.
                texture_atlas: Some(TextureAtlas {
                    layout: atlas_layout.handle.clone(),
                    index: 0,
                }),
                // End NEW.
                ..default()
            },
        },
    );
}

Running cargo run again will display the player glyph, cropped appropriately! But...

A Bevy app with a blurry image of the player character glyph in the centre.

Hmm, did I forget my glasses?

fn main() {
    App::new()
        .add_plugins(DefaultPlugins.set(ImagePlugin::default_nearest())) // CHANGED!
        .init_resource::<SpriteSheetAtlas>()
        .add_systems(Startup, setup_camera)
        .add_systems(Startup, spawn_player)
        .run();
}

Much better. Activating default_nearest in Bevy options like this helps render pixel art in pixel-perfect mode.

Enter cargo run again to finish the first part of this tutorial!

A Bevy app with a clean image of the player character glyph in the centre.