Bevy Traditional Roguelike Quick-Start - 1. Drawing the Player Character
Traditional roguelikes are an ancient genre of games which earned the peak of their fame in the 20th century. They are the ancestors of modern indie roguelikes beloved by many such as Hades, The Binding of Isaac or Risk of Rain. What a "true roguelike" is has been the driving force of multiple Internet flamewars, but it almost always revolves around this list:
- The game takes place on a grid, like Chess.
- The game is turn-based: the player moves, then monsters do.
- The environment is randomized with procedural generation.
- When the player dies, the game restarts from scratch.
Traditional roguelikes, despite their age, still live today. Major releases with a still active community today include:
- Caves of Qud
- Dungeon Crawl Stone Soup
- Cataclysm Dark Days Ahead
- Nethack
There are multiple reasons why I think this genre is well suited for a beginner-level Bevy Quickstart guide:
- Traditionally
terribleminimalistic graphics. No great artistic expectations will be forced on you! - Infinitely extensible design that lends itself very easily to imagining new abilities, foes and challenges!
- An Event-centric, turn-based architecture to show off the power of Bevy's ECS.
- Fun! For nerds.
This tutorial assumes:
- That you have never touched Bevy before.
- That you have some beginner Rust experience and know what "borrow checking" is. If you do not, I recommend going through the first half of the rustlings suite of interactive exercises to get you up to speed.
- No concurrency or dynamic dispatch Rust technowizardry will be required. Only the basics.
The nature of ECS has been covered earlier in the Quick Start guide. Here is a metaphorical reminder:
- Entities - The actors on the stage.
- Components - The costumes and characters worn by the actors.
- Systems - The script of the play.
Setting the Stage - The App
Writing cargo new bevy-quick-start creates a Rust version of the evergreen Hello World program. It feels quite distant from anything resembling a game you can play in a contained window, except perhaps a prehistoric text adventure. Let's fix that by replacing the code in fn main:
/// The entry point into the game, where everything begins.
fn main() {
    App::new()
        .add_plugins(DefaultPlugins)
        .run();
}
It would also be wise to import Bevy in a Bevy project. Place this on the very first line of main.rs:
use bevy::prelude::*;
The App is the primary container of the game - the theatre in which the actors will play. To ensure it starts off with all the basic Bevy features, the DefaultPlugins plugin must be tacked onto it.
Running this code with cargo run will result in an empty, boring window. Progress!
The First Denizen - The Player
The player needs an avatar through which they will interact with the game world. In a traditional roguelike, this player will be a Creature - just like the foes and friends they will meet - susceptible to motion, health and other restrictions that come from having a physical body.
In fact, our game will likely be populated by a lot of these Creatures. Let us define what that is:
/// Common components relating to spawning a new Creature.
#[derive(Bundle)]
struct Creature {
    sprite: Sprite,
}
Right now, a Creature doesn't have much more beyond a sprite, which is its graphical representation on screen.
And let us spawn the player:
/// Spawn the player character.
fn spawn_player(
// Bevy's Commands add, modify or remove Entities.
mut commands: Commands,
// A builtin Bevy resource that manages textures and other assets.
asset_server: Res<AssetServer>,
) {
// The spawn command summons a new Entity with the components specified within.
commands.spawn(Creature {
sprite: Sprite {
// What does the player look like?
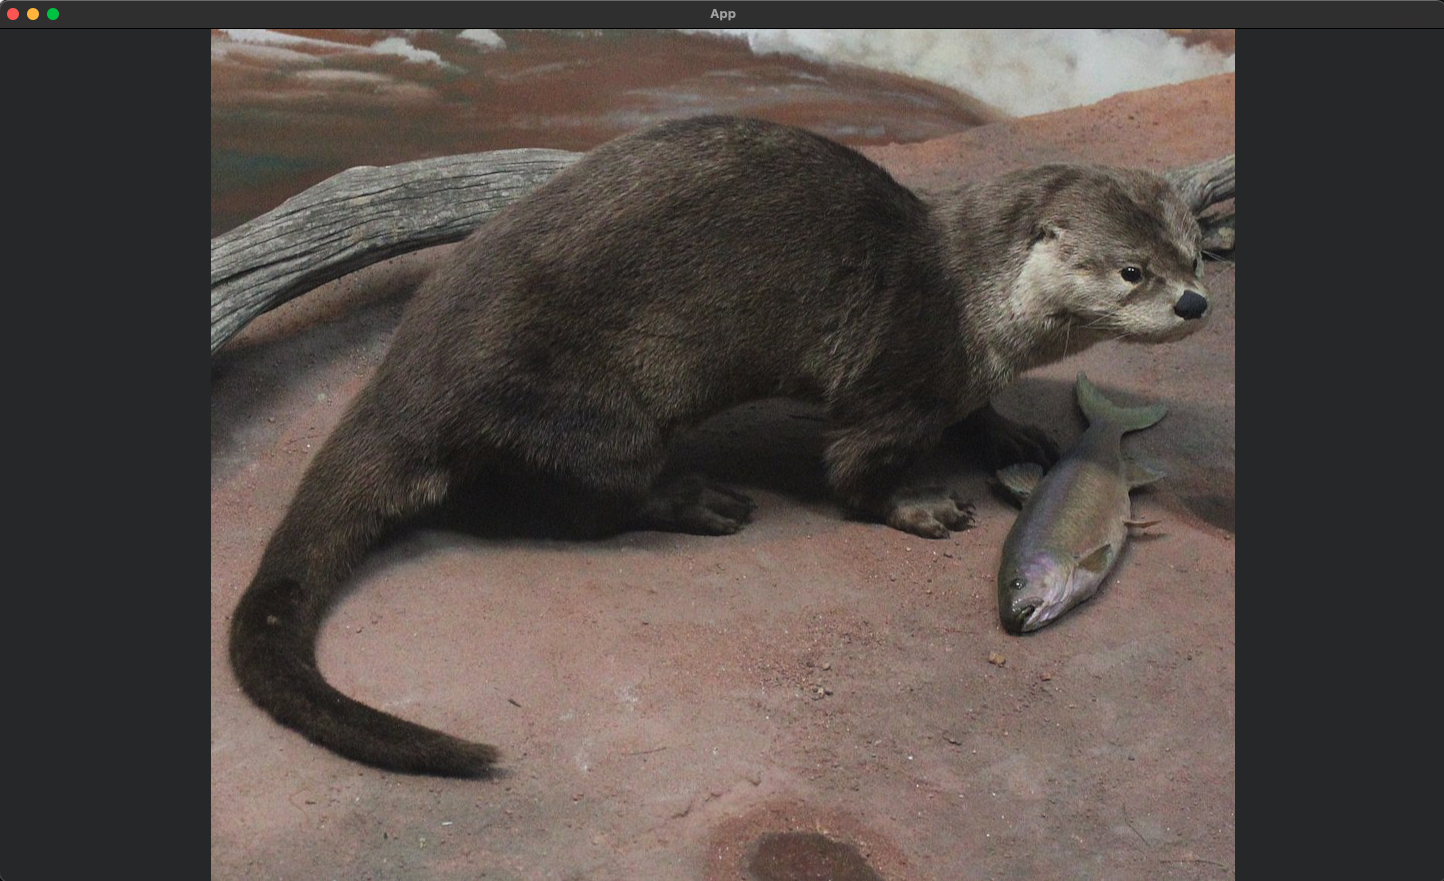
image: asset_server.load("otter.png"),
// Everything else should be default (for example, the player should be Visible)
..default()
},
});
}
At any moment while using Bevy, should one need to:
- Spawn a new Entity
- Delete an Entity
- Attach a new Component to an Entity
- Remove a Component from an Entity
A mutable Commands argument will likely be required. This is the case here, as a new Entity is being spawned.
Since we are also pulling a visual asset from a file into the game, the AssetServer is similarly required. It is a Resource, shown by the wrapping Res<_>, which is a Bevy type to be discovered later in this tutorial.
We will also need to run this new function - or, in Bevy terms, System - by attaching it to the ̀App:
fn main() {
    App::new()
        .add_plugins(DefaultPlugins)
        .add_systems(Startup, spawn_player) // NEW!
        .run();
}
Startup systems run once when booting up the app, then are never ran again.
The player is thus spawned with the texture "otter.png" at the position (0.0, 0.0, 0.0). Note the Z-coordinate - in a 2D game, it is still useful, as it determines which Entities get to be drawn on top of each other. More on that later.
Using cargo run on this will result in an error:
ERROR bevy_asset::server: Path not found: your/path/here/bevy-quick-start/assets/otter.png
Of course, we need to provide the image. In your game's root directory (where src and Cargo.toml currently exist), create a new directory named assets. If the App is the theatre, this is the costume storage - containing all the image data that Entities can take up as their visual sprite representations.
Then, place any image of your choosing within it, renaming it so its filename matches the one used in the ̀texture field in your code.
Are you ready? cargo run! This will result in the exciting sight of... absolutely nothing.
Bird's Eye View - The Camera
In Bevy, spawning entities left and right isn't very interesting if we are incapable of viewing them. We need to give ourselves eyes to see - a Camera:
/// The camera, allowing Entities to be seen through the App window.
fn setup_camera(mut commands: Commands) {
    commands.spawn((
        Camera2d::default(),
        Transform::from_xyz(0., 0., 0.),
    ));
}
Quite similar to spawning the player - after all, a Camera is just another Entity, just like anything in a Bevy game. The only difference is in its Components, which include Camera. Somewhere, deep in Bevy source code, there is a System fetching any Entity that contains Camera and doing some magic to make it display the screen's contents.
We also need to welcome this new actor onto the stage by tying it to the App:
fn main() {
    App::new()
        .add_plugins(DefaultPlugins)
        .add_systems(Startup, spawn_player)
        .add_systems(Startup, setup_camera) // NEW!
        .run();
}
Running ̀cargo run will now - assuming you had as much good taste as I did to pick a cute otter as my example image - display the player "character"!
Bundling Them Up - The Spritesheet
Unfortunately, we cannot build our epic roguelike dungeon out of otters. There will be different Creatures - foes, friends, or even walls - the latter behaving like other beings, letting them have health and be shoved around. They will be represented by different glyph-like sprites, and throwing around 100+ .png files in the ̀assets directory is not my definition of careful organization.
This is where the Spritesheet comes in - one image containing all game sprites next to each other, with a special Atlas to dictate which part of this image will be cropped out to represent each Creature.
#[derive(Resource)]
struct SpriteSheetAtlas {
    handle: Handle<TextureAtlasLayout>,
}
This marks the creation of our first Resource. A Resource, in Bevy, is basically a global mutable variable. You can imagine it in the same way that you need to spend "wood resources" to build houses in a construction game - the wood is likely represented by a little icon on the side of the screen with a number next to it. It doesn't belong to a certain Entity - it belongs to the game as a whole.
In this case, this Resource is an Atlas, mapping the spritesheet to divide it in tidy 16x16 squares. It will be accessible each time a new Creature is made, to assign it a specific region of that spritesheet.
This Resource must be initialized:
/// An initialization of the sprite sheet atlas, ran from `init_resource`.
impl FromWorld for SpriteSheetAtlas {
    fn from_world(world: &mut World) -> Self {
        // The spritesheet is composed of 16x16 squares.
        // There are 8 sprite columns, spread across 1 row.
        // There is no padding between the cells (None) and no offset (None)
        let layout = TextureAtlasLayout::from_grid(UVec2::splat(16), 160, 2, None, None);
        // Grab the active atlases stored by Bevy.
        let mut texture_atlases = world
            .get_resource_mut::<Assets<TextureAtlasLayout>>()
            .unwrap();
        // Add the new Atlas in Bevy's atlases and store it in the Resource.
        Self {
            handle: texture_atlases.add(layout),
        }
    }
}
Any Resource which implements FromWorld will, upon running init_resource, run the code contained in the impl block to create a new instance of it.
The TextureAtlasLayout specifies the crop layout. Each sprite is 16x16 (UVec2::splat(16) is a shortform of UVec2::new(16, 16)), there are 160 sprite columns and 2 rows, and there is no padding nor offset (None, None).
This is stored into Bevy's atlases list, and is saved into the Resource for future usage.
At last, this spritesheet must be properly welcomed through the App:
fn main() {
    App::new()
        .add_plugins(DefaultPlugins)
        .init_resource::<SpriteSheetAtlas>() // NEW!
        .add_systems(Startup, setup_camera)
        .add_systems(Startup, spawn_player)
        .run();
}
Now that we have our Atlas, we need to add it to new Creatures. Not only do they have a sprite (the spritesheet), they also have a select crop of that spritesheet (the Atlas) to represent them:
fn spawn_player(
    mut commands: Commands,
    asset_server: Res<AssetServer>,
    atlas_layout: Res<SpriteSheetAtlas>, // NEW!
) {
    commands.spawn(
        Creature {
            sprite: Sprite {
                // CHANGED to spritesheet.png.
                image: asset_server.load("spritesheet.png"),
                // NEW!
                // Custom size, for 64x64 pixel tiles.
                custom_size: Some(Vec2::new(64., 64.)),
                // Our atlas.
                texture_atlas: Some(TextureAtlas {
                    layout: atlas_layout.handle.clone(),
                    index: 0,
                }),
                // End NEW.
                ..default()
            },
        },
    );
}
Running cargo run again will display the player glyph, cropped appropriately! But...
Hmm, did I forget my glasses?
fn main() {
    App::new()
        .add_plugins(DefaultPlugins.set(ImagePlugin::default_nearest())) // CHANGED!
        .init_resource::<SpriteSheetAtlas>()
        .add_systems(Startup, setup_camera)
        .add_systems(Startup, spawn_player)
        .run();
}
Much better. Activating default_nearest in Bevy options like this helps render pixel art in pixel-perfect mode.
Enter cargo run again to finish the first part of this tutorial!